Tutorial Two:
Displaying Images and Videos in OpenCV 2.2
For this second tutorial I am going to
walk through the simple workings of a few basic programs. These programs will
easily enable you to open images and video using OpenCV.I
will also provide an explanation of how to modify an image using basic
transformations, which will prove very useful once we get into the later
tutorials.
To use the follow examples open these .cpp files in the same solution you created in tutorial one,
or relink all the libraries and includes as demonstrated in tutorial one.
Files
you will need: monster.jpg, Truck.avi
Example
1: Example1.cpp
This first example will show you how to
open an image from a file. OpenCV can read a large
array of files types but for the purposes of these tutorials I will use .jpg
files.
#include "highgui.h"
int main( int argc, char** argv )
{
IplImage* img = cvLoadImage( “monster.jpg” );
cvNamedWindow("Example1",
CV_WINDOW_AUTOSIZE );
cvShowImage("Example1", img );
cvWaitKey(0);
cvReleaseImage( &img );
cvDestroyWindow("Example1");
}
There are a few very important methods
that must be mastered in this example.
The
foundational data type we need to learn is IplImage. IplImage functions in the same
way as a standard data type, such as an int, except it stores an image.
Note: We
will always use pointers when creating IplImage objects.
cvLoadImage() is a function that allows us to load an image into
an IplImage
data type. To load an image from a file make sure that the image is stored in
the same place as the source code, and include the filename and extension in
quotes such as “monster.jpg”.
cvNamedWindow() is a function that creates a new window to display
your new image in. This function takes two arguments, a window label and the
size of the window. We will call this window “Example1” and use
CV_WINDOW_AUTOSIZE to make the window the same size as our image. This is
usually the best way to define your new window.
cvShowImage() is a function that uses the window defined by cvNamedWindow() and displays the image. It has two
arguments, the window label as defined in cvNamedWindow() and the IplImage you wish to display.
cvWaitKey() is a function that allows you wait for a
predetermined number of milliseconds for a keystroke. If you enter 0 as the
argument it will wait indefinitely for a key to be pressed. In this case once a
key is pressed the window will close.
cvReleaseImage() and cvDestroyWindow()
are two of the most important functions to remember. They will clear the window
and image from the memory. To clear the IplImage we allocated a pointer to we must use a reference
(“&”) and to destroy the window enter the window label.

That’s all it takes to
display an image!
Example 2: Example2.cpp
OpenCV
has the capabilities of reading a variety of video types,
however for the purpose of these tutorials I will be using .avi
files.
#include "highgui.h"
int main( int argc, char** argv ) {
cvNamedWindow( "Example2",
CV_WINDOW_AUTOSIZE );
//CvCapture* capture = cvCaptureFromAVI( “Truck.avi” ); // either one will work
CvCapture*
capture = cvCreateFileCapture( “Truck.avi” );
IplImage* frame;
while(1)
{
frame = cvQueryFrame( capture );
if( !frame ) break;
cvShowImage( "Example2",
frame );
char c = cvWaitKey(33);
if( c == 27 ) break;
}
cvReleaseCapture( &capture );
cvDestroyWindow( "Example2" );
}
This example is slightly more complicated than the
previous, although it follows the same procedure. To display a video we need to
treat each frame as an image and display they
respectively. To do this we will need to learn a few more methods.
First
thing you may notice is that we have a new data type, CvCapture. This functions in a
very similar way to IplImage
but instead stores a video file.
Note:
We will also use pointers when creating CvCapture objects.
cvCreateFileCapture() and cvCaptureFromAVI()
are used to grab a video and store it into a CvCapture data type. Both of them
function in the same way however cvCreateFileCapture is able to read more than just .avi file types, whereas cvCaptureFromAVI() can only read .avi file types. To use a video
from a file make sure that the video is in the same folder as the source code
and call it by putting it in parenthesis and including the file type. Ex.,
“Truck.avi”.
We will be outputting the video one frame at a time,
to ensure the entire video is played we will make an infinite while loop which
displays one frame per loop. To store display the CvCapture video we must first
store a frame into an IplImage.
To do this we use a method called cvQueryFrame(), this member grabs a frame from the CvCapture object
and remembers (in a sense) which
frame was last captured. This allows you to consecutively call the method and
have it give you each consecutive frame. We will store each frame into an IplImage type and
display it.
Between each frame we will wait 27 milliseconds for
a keystroke; if one is received we will break the loop and end the video. If no
key is pressed the video will play until it runs out of frames and then we will
break the loop.
Once
again we will use cvReleaseCapture() and cvDestroyWindow()
to clear our memory. We want to be responsible J
Enjoy!
Example 3: Example3.cpp
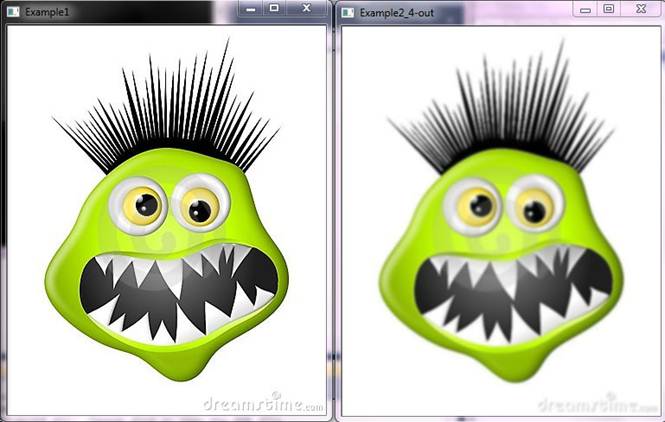
In
this example I will demonstrate how to do a simple smoothing operation on an
image. This can prove useful later on for many applications such as edge
detection, which is used in many facial expression detectors and movement
trackers.
#include "cv.h"
#include "highgui.h"
void example2_4( IplImage* image )
{
// Create some windows to show the input
// and output
images in.
//
cvNamedWindow( "Example3-in",
CV_WINDOW_AUTOSIZE );
cvNamedWindow( "Example3-out",
CV_WINDOW_AUTOSIZE );
// Create a window to show our input image
//
cvShowImage( "Example3-in",
image );
// Create an image to hold the smoothed output
//
IplImage* out = cvCreateImage(
cvGetSize(image),
IPL_DEPTH_8U,
3
);
Here we are
introduced to a new method, cvCreateImage(). Instead of just using an IplImage of an already existing image we are creating a new
blank image. The arguments used to do this are:
·
Size
(height and width)
·
Depth (can
be one of IPL_DEPTH_8U - uint
8-bit integers IPL_DEPTH_8S - signed 8-bit integers IPL_DEPTH_16U - uint 16-bit integers IPL_DEPTH_16S - signed 16-bit integers
IPL_DEPTH_32S - signed 32-bit integers IPL_DEPTH_32F - single precision
floating-point numbers IPL_DEPTH_64F - double precision floating-point numbers)
·
Channels
(1, 2, 3, or 4, this means how many channels per pixel, for example a 3 channel
image has blue, green, and red channels)
Because we
are making a copy of the image we use cvGetSize() to get the size of the original
image.
// Do the
smoothing
//
cvSmooth( image, out, CV_GAUSSIAN, 5,5 );
cvSmooth( out, out, CV_GAUSSIAN, 5, 5);
Here we are introduced to cvSmooth(), which allows us to apply many
different smoothing effects on an image. For more information on the
capabilities of cvSmooth() click here.
cvSmooth() takes 5 arguments:
·
The source
·
The destination
·
The smoothtype
·
Parameter 1 (adjusts amount of smooth)
·
Parameter 2 (adjusts amount of smooth)
// Show the
smoothed image in the output window
//
cvShowImage( "Example3-out",
out );
// Be tidy
//
cvReleaseImage( &out );
// Wait for the
user to hit a key, then clean up the windows
//
cvWaitKey( 0 );
cvDestroyWindow("Example3-in"
);
cvDestroyWindow("Example3-out"
);
}
int main( int argc, char** argv )
{
IplImage* img = cvLoadImage( "monster.jpg");
cvNamedWindow("Example3",
CV_WINDOW_AUTOSIZE );
cvShowImage("Example3", img );
example2_4( img );
// cvWaitKey(0);
cvReleaseImage( &img );
cvDestroyWindow("Example3");
}
It’s that easy to
modify an image! Play around with different smoothing types and see what is
possible with such a simple method. If you want to further explore how videos
and image blurring works try to add cvSmooth to your
video example!
All of the examples used are from the book, Learning
OpenCV: Computer Vision with the OpenCV
Library
If
you have questions or comments feel free to email me at: matthew.h.fichtner@biola.edu