Since HTML was not designed as a graphics layout language, you are limited in the ways you can place things on a page. To get around that, most people use the TABLE feature of HTML to divide up the space on a web page.
Tables are useful for arranging pictures and for making Navigation Bars
Arranging Pictures
If you want to place two pictures next to each other on a web page, you'll need to create a table, and put the pictures in separate cells. Here's how: First, create a 1 by 2 table:

That will create a table that looks like this:
You can now place two pictures side-by-side by putting each picture in its own cell of the table. It's usually a good idea to center each picture within the cell (Click on picture to select it, then click on the Center button).
|
|
|

Although tables are useful for arranging pictures, you usually don't want to see them. That's one of the things you can change in the Table Properties dialog box. Right-click anywhere in the table, and choose Table Properties:

Change the Borders.. Size to be 0. That will make the table invisible (although you'll still be able to see the dotted lines as you're editing in FrontPage 2000. Depending on the layout of your page, you may also want to un-check the Specify Width box, or change the value.
Creating Blocks of Color
Since you can change the background color of individual cells, using tables is an easy way to create sections of color on your page. For example: making a navigation bar, across the top or left of the screen.
Top Navigation Bar: To make a navigation bar across the top of the screen, just make a 1 by 1 table, right-click on it, and set the Border Size to 0, then change the background color. It will look like this:
![]()
Then you can type whatever you want in that box as a Navigation bar.
Left-Hand Side Navigation Bar: If you want to make a light blue navigation bar along the left-hand side of the screen, create a 1 by 2 table at the top of the file, then Right-Click on the left cell, choose Cell Properties and change the Background color to light blue, Change the Specify Width to something like 120 pixels:
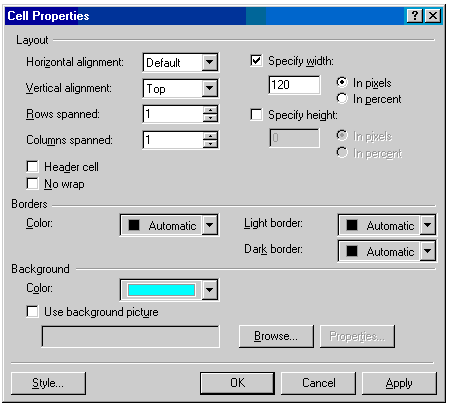
You'll also have to change the Vertical Alignment to Top. Finally, change the cell properties in the right-hand cell, and un-check the Specify Width in that cell. Once you do all of this, you can put your Navigation information on the left hand side, and the entire contents of the rest of the page on the right-hand side.
Next: Adding Pages/Links